Posts

Showing posts from April, 2013

Anniversary Nails

Image
My husband and I hit a milestone today..it's our 10th Wedding Anniversary! So, as with most special occasions, I must create themed nails :) It took me a while to decide on a design, but finally decided on a way to incorporate both of our favourite colours, green and pink.  After my base coat of choice, Orly Bonder, (no surprise there) I applied Blush-Amour no 32 for a base colour. This is a gorgeous pearl white colour. It is quite a sheer shade. The next coat of this colour was rather thick, I didn't want it drying in a hurry.  Next I applied dots of  Sally Hansen HD polishes in Pixel Pretty and Digital, both gorgeous metallic colours. I only applied these dots to the top half of my nails.  I also added a couple of dots of Blush-Amour in a shimmery gold, which I seemed to have left out of the pic, oops!! Blush-Amour can be found at select "cheapie" stores, I think I paid $2 each, and I must say that the quality is quite decent.  Moving quickly, I u

FOTD

Image
I recently found a couple of mineral eye shadow samples that I had transferred into small jars from plastic baggies. These were from online indie company Archetype Minerals. I had a quick search online, and am not surprised that I could not find their store. The shadows are amazing, they were cheap, 50 cents a sample from memory, BUT, service was the slowest that I had ever come across. Thankfully, I received all orders (I think I placed 3), though waiting for at least 3 months was certainly not ideal! As I said, the eye shadows were truly lovely, and compared to some of the colours that I have, the two that I used were very plain, but still nice colours for day wear.  I "primed" with Skin79 BB cream, then used a light dusting of my custom EDM foundation (just a mix of finishing powders, bronzer and concealing powder). I like to use the Maybelline Mineral concealer to brighten under my eye area, whilst also helping to clean up any fall out. As this is

Project Increase Storage Space- Making Lip Palettes

Image
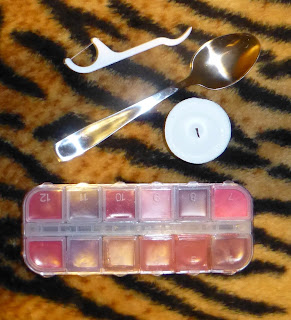
I have so many lipsticks in my collection that I have run out of room to store them. Now, I could just stop buying lipsticks (gasp!) which I have truly tried, and have succeeded to lessen the amount of purchases, but there's always some new lip products released, or a colour that catches my eye that I just have to own. Well, I have stumbled upon a solution. Turning my lipsticks into a lip palette! It's not a new idea, there are plenty of tutorials on youtube, but I just had to give it a go. I know there are more glamorous ways to melt lipstick, but I went a simple route. I placed lipstick in a tea spoon, scraping inside the tube with the plastic tip of a floss stick to ensure that I wasn't wasting too much product. I then melted it over a tea light candle and very carefully poured into a section of my chosen palette. This being a container meant for nail crystals. With a lid for each section, I thought this container would be ideal to be used as a lip palette. I didn

Smouldering Nails

Image
I really can't seem to get the hang of the gradient nail design, but I'll keep trying. In saying that, I was content with the overall look of my nails.  After applying Orly Bonder base coat, I applied a coat of MUD nail polish. I am not supposed to buy nail polishes until I start using some up, but find it so hard to pass a bargain price. I hadn't tried this brand before, but I thought at $2, I had nothing to lose. I like the creme formula, and think it's quite a decent polish for the price. Next, I painted 2 vertical lines of nail polish onto the make up sponge, ensuring that Models Inc nail polish in Deep Plum was applied to my tips. The lighter red colour, Sally Hansen Laquer Shine in Dazzling (such a divine red!) I used as a colour to blend the deeper red with the peachy creme colour. I then patted the sponge onto the top half of my nails. Attempting gradient nails I find difficult for some reason, however, I am learning that being generous with

Mirenesse Pearl Crush Creaseless Shadow

Image
With a name like Pearl Crush, these eye shadows sound divine, it's what drew me to these eye shadows. That, and the fact that the brand is Mirenesse, one in which I have come to love. You can purchase from their website , to be honest, I find them to be expensive at full price, however, they do offer good sales. With the right timing, I've been able to find good deals on ebay. Plus there is the occasional Mirenesse product on offer with a magazine purchase. I bought the trio in Akoya Pearls. I just love the cute packaging that Mirenesse offers, and as you can see, these eye shadow trios are no exception. The plastic casing feels quite solid, which is a good thing when it comes to protecting delicate eye shadows. This also makes them perfect for travel, as they are more durable. These eye shadows have texture that feels like velvet, so luxurious to the touch. When applied dry the eye shadows have a pearl like finish. Using a damp brush gives the eye shadows depth, making the

FOTD

Image
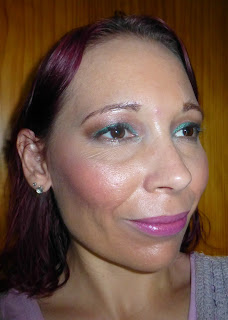
Just because it's autumn, doesn't have to mean saying goodbye to colour, or a dewy complexion. Mind you, the lovely weather lately could fool us into thinking that it was Spring, my favourite season. I love to use the Skin79 BB cream as a primer, I find that it especially works well underneath mineral powder foundation, which happens to be what I used. A custom mix of various EDM finishing powders, concealer and bronzer to deepen colour. I really like the finish, not too heavy, yet evens out the look of my pigmented skin. On my lids, I applied Persephone's Pluto Planet Power over my Silk Naturals primer. Unfortunately this company no longer operates, so I will have to make this gorgeous eye shadow last (secretly, I have a feeling that I'd have a colour like it hidden somewhere, lol). This eye shadow has a green base with blue shimmer. It is easy to work with and blend. In my crease I used the dark brown from my faux Nars palette, plus the neutra

A Focus on Lumiere Foundations

Image
I've been a fan of mineral powder foundations for some time. My introduction to mineral make up was Everyday Minerals. I liked it to the point that I bought so much product that I'm only just getting to my last supply. I thought it was time to begin trialling from other mineral make up companies. I was so impressed with Lumiere's luxurious eye shadows, that I decided to make a purchase to include a "Try Me! Sample Baggie Kit"   In this sample kit you receive 8 baggies, with the choice of foundation finish, colour and the chance to try blushes as well. There are many foundation colours available. There's even an option for an untinted base, so that you can add to your foundation to lighten it. If you still haven't found your match and feel that you are between 2 colours, custom mixes are also available So, all skin tones are catered for. Four finishes are available: Veena Velvet- A buildable coverage from light/medium to heavy, that is for normal to

Sarawen

Image
I really can't remember how I came across Etsy store, Sarawen perfumes, but wow, these perfumes impressed me!  Described as "Unique perfume oils inspired by all things Literary, Magical, Historical, Gothic, and Geeky!" There's bound to be a fragrance to appeal to all tastes. I prefer to try before I buy, especially when it comes to perfumes. Thankfully, most indie perfume stores sell samples, Sarawen is no exception. The hard part was xhoosing from the range, without trying everything! As you can see, I was quite restrained with my order. I've really had to try and rein in my spending, so a I figured that a small number of samples wasn't going to hurt. Currently on the website it appears that the sample vials have been replaced by tiny jars with screw top lids. To be honest, I don't mind either. The perfumes that I tried are as follows: Vanilla Vamp: * Rich, sensual, musk-laced vanilla topped with tropical fruits and almonds over darkened myrr